A Love Story

Pete and Lisa
Our homes are such personal expressions of ourselves, and each home has a story, packed with the dramas of our lives. Three years ago, Pete Leese and Lisa Harrington visited my home office. Pete had suffered a debilitating auto-immune illness, and was unable to walk. Pete and Lisa explained that he would one day regain the use of his legs, but that it was a long recovery process. This did not deter them from moving ahead with their home building and wedding plans.
This is the Pete’s and Lisa’s story, told in Lisa’s own words:
“Greetings from State College!  These pictures are way too long in coming to you and as I look over the hundred plus pictures of various aspects of brick installation I realize that we live life as a work in progress so finding “finished” pictures was nearly impossible.  When Pete and I visited you in 2014 at your home he was still in a wheelchair.  He is now walking with crutches (and during brave moments without them).  He and I installed the front room floor and both bathroom floors on our own. “
 “I laid tile and he helped me grout. We hired masons to do the fireplace as working on scaffolding 18 feet off the ground is not my kind of job. We learned a great deal as we worked including how to use an angle grinder to cut the tiles…beautifully!”
Installing thin brick tile
“We found time to get married and our two special tiles – 2014 and a double wedding ring – are worked into different floor sections.”
“We added a mosaic tile from the Moravian Tileworks in Doylestown, PA where Pete is from.”
Brick tile fireplace with shamrocks
“We then had what we found to be a “happy accident” because we had significantly over ordered tile.  We did all the measuring so I’m not surprised.  We planned to finish the basement and the chimney extends to the foundation in the center of the house.”Thin brick clad fireplace
“We had enough tile for 3 sides of the fireplace and the hearth for the wood stove. “
Wood stove with brick tile veneer
“The fourth side we covered in an awful imitation brick that a friend had in his shop from a very old job.  This side was painted and received a decorative painting by my talented daughter and fitting for our country setting.”
“And believe it or not that’s the short version of our story. We continue to work on the house and start new projects before finishing old ones. If you ever travel this direction please give us a call. We would love to see you and show our tile off in person. (I love that most people don’t believe it’s tile and not full brick! And even more that we did much of the work ourselves.)
Thank you for all of your help and patience!
Lisa Harrington and Pete Liese
P.S. Yours is the only banana bread recipe I use anymore! Thank you!”
Here is my recipe card for banana bread that I shared with Lisa. It is super easy. Just mix the wet ingredients, add the dry ingredients, and pour in a greased loaf pan. It might take more than an hour to bake at the low temperature — it should not be wiggly on top, but not real hard, either. It is very moist, with all those extra-ripe bananas in it. Turn out on a rack, and cool. It is the best!

How Do I Install A Brick Tile Wall or Floor?

It has been a while since I’ve posted in the blog — where has the time gone?!  I decided to do a series of “questions and answers,” inspired by years of talking on the phone with my customers. I hope this will be helpful. The first will be on the subject of installing the tiles, with a few tips and hints. This is a DIY guide to installing brick tiles, geared to home owners who would like to do this themselves.

Inglenook brick tile installation in progress

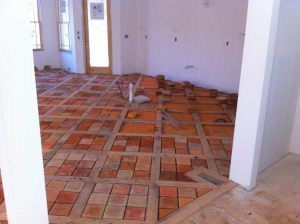
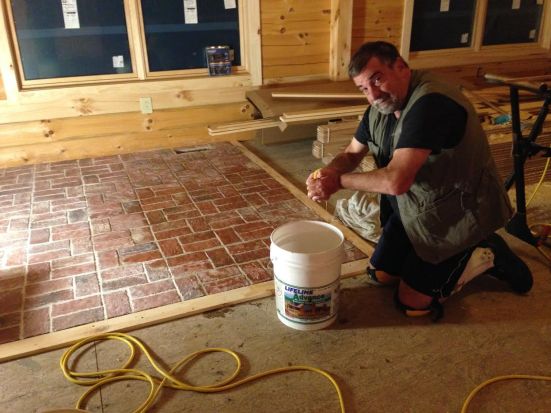
Brick tile installation in progress

As with any tile, you want to be sure you are installing over a firm surface. If you are installing over cement, you already have a solid bed. If you are installing over a wooden subfloor, you need to add a substrate, like concrete board. You may not realize it, but when you walk across a wooden floor, it sets up a bounce. Inglenook brick tiles will not be harmed by this, but you may pop the grout over time. Regular 1/2″ cement board is most often used. You would lay this over the plywood subfloor, and screw it down securely with deck screws every 6 to 8 inches. Your hand-held electric screwdriver makes this job fast and easy. You may even want to put a material like liquid nails between the layers. Then you would tape the joints to create a seamless bed for your tiles. If the height is a problem with 1/2″ cement board, Schluter makes a product called Ditra, which is very thin. Blanke Permat is another similar product that our customers like to use.

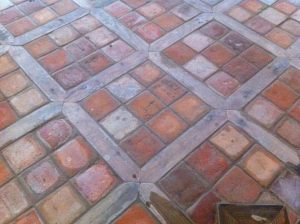
The quantity of tiles we send for an order assumes a 1/4″ between the tiles. Some of our tumbled tiles have a ledge around the edge, and that ledge is covered by the grout. For the grout stability, it is important that you still have a gap between the tiles, so that the grout is not just laying on the shallow shelf, but also reaches to the substrate. The tumbled edges create a “thick and thin” grout line.

Using spacers in Inglenook thin brick tile wall installation

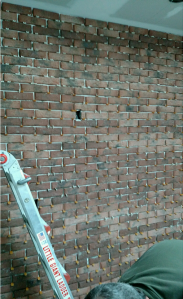
Using spacers in brick tile wall installation

You will cut the tiles on a wet saw. They are too tough to score and snap. Working with a wet saw is like working with a circular saw that spits water. These can be rented from an equipment rental business, but you can buy a tabletop model from a box store — probably cheaper than you can rent it for a day or two. I have always been glad I have mine, and have been happy to loan it to friends. You will often need to cut your tiles when you come to the edge of your tiling area.

If you are laying the tiles on top of cement, you will want to dampen the cement. This is so the moisture isn’t pulled out of the thin-set skim coat too quickly, which weakens the bond. You may also make the tiles damp, for the same reason. You want this to dry relatively slowly on a cement base. Trowel the thin-set adhesive over the base, and spread with a 1/2″ notched trowel. Nest the tiles over the thin-set, and use light pressure to create a bond. Let your floor dry thoroughly, but not too quickly. Some installers will cover the floor with tarps for a day or two, to create a better bond.

Installing brick tile in thin set on a wall

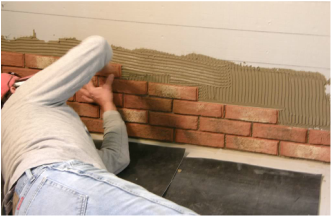
Installing brick tile using thin set on a wall

If you are laying the tiles over subfloor and cement board, then use any thin-set adhesive. Some installers will use a quick-set material. Nest the tiles in the thin-set the same as above, and then let the floor dry. This drying time will vary, depending on the material used, the temperature and the humidity. If you are covering a wall or ceiling, then use a non-sagging adhesive. Laticrete Multimax is a great choice for walls and ceilings.

When your thin-set is dry, you are ready to grout. Use either a brick mortar, or a sanded grout. There are many colors available at box stores. For most installations, I personally prefer a basic off-white/pale gray color of a traditional lime mortar. Another color I like is Haystack, by Polyblend. That is easily found at Home Depot. I don’t think that gray grouts with blue tones in them compliment the tiles. There are grays that have tan tones, and that is warmer with the brick color. Remember that the sealer you use may darken the grout. If you want to get more creative, Lime Works (www.limeworks.us) makes historic lime mortars, and some have slag flecks or ground-up oyster shells in the mix. When choosing your grout, I sometimes suggest that you buy small boxes of a few different colors, and mix them up in a paper cup. Put the wet grout on a piece of aluminum foil or a paper plate, smooth it out a bit, and let it dry. If you are impatient, you can put the setting grout near a heat source (or in the sun) to hurry the experiment. When completely dry, put some of the sealer on them. That way you will have a better idea of how the grouts may be transformed by the sealers. There is one penetrating sealer that I often suggest, which dries back to the original color, but others will darken or enhance the color.

Inglenook brick tile ready to grout

Installed and ready for grout

Mix to the manufacturer’s directions. When you think about the method of grouting your tiles, consider the look you want. Do you want a smooth, sponged grout line that is level with the top, a slightly indented smooth line, or one that is more rough? How you grout will also affect the amount of clean-up after filling the joints.

Some people like to bag in their grout, or use a refillable caulking gun. Others mix a thicker mortar or grout consistency, and then trowel it in. You will mix smaller batches to do this. This is the traditional way masons fill in the joints of brick and stone. The nice part about this method is that the surface stays cleaner. Just let the excess grout or mortar lay on the top, and sweep it away when it sets up. Put the mix on a board, hold the board along the joint, and cut a line of it into the gap. Tamp it down with the edge of the trowel to remove air pockets, then turn the trowel sideways to “strike the joint.” That is removing any excess material that is sticking up above the surface. You will get a rougher joint when you do this. You can also use the curved bowl of a spoon to smooth the line, and make the joint a little lower than the surface, if you prefer that look. Alternately, you can use a wet sponge to make the grout level with the top. You will have more clean up to remove the grout haze later when you use a sponge (unless you seal with Enrich ‘N’ Seal). Some people “float” the grout. Do not expect to get it out of the texture of our more rustic tiles, if you do that. However, many people like the grout in the texture. You just need to be sure you are one of them before you grout this way. If you are using one of the tiles in our Manor Collection, you won’t have to worry about it sticking in the texture. After rinsing the floor until the water runs clear, you let it dry. Then you can use a commercial grout haze remover, or a dilute muriatic acid wash (rinse it well afterward, and wear chemical gloves) to clean off the cloudy haze. Some customers have used white vinegar, but it is more time-consuming to let it sit on the top and keep rinsing. You can also seal with Aqua Mix Enrich ‘N’ Seal to remove the haze. Be sure you want a matte finish if you use it, though, because no shiny top coat will adhere to it.

Grouting Inglenook brick tile

Grouting Inglenook brick tile

Your last step will be sealing your floor or wall. There are sealers that will give high shines and low shines, and others that are invisible and matte. There are many products on the market. You can get them at any box store, or on line. I have found primetimesolutions.com to be a good source for online ordering.
I like Enrich ‘N’ Seal (Aqua Mix) as a penetrating sealer. Not only does it do a great job sealing, but it also will remove any haze that you may have on your tile surface. Just be sure not to let it puddle on the tiles — remove excess before it dries. You will also be sealing the grout. The tiles will be darker after using this product. If you love the color exactly as it is, then Tile Lab makes Surfaceguard Penetrating Sealer. That will not remove haze, but it will dry to the color the tiles were before sealing them. Tile Lab, Behr, Aqua Mix, Miracle Sealants all make different levels of shine, and so do other companies. The penetrating sealers are one coat, and good for about 15 years. The ones with a shine require several coats, and may need to be refreshed in high traffic areas every few years.

Installed Inglenook brick tile floor before sealing

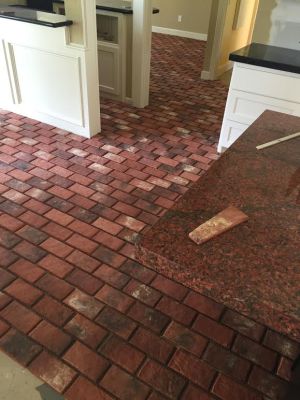
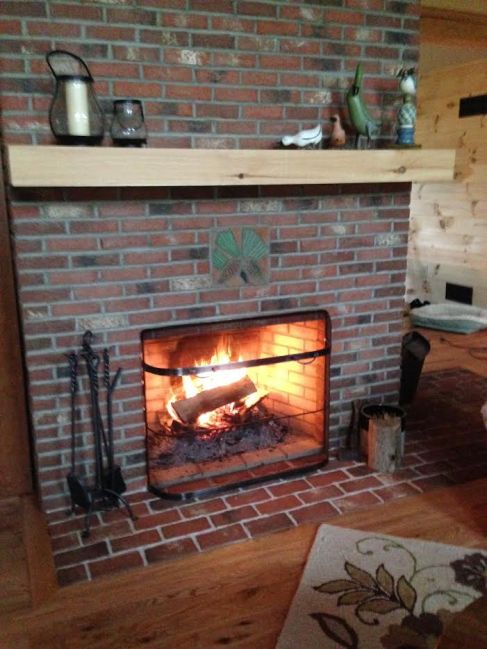
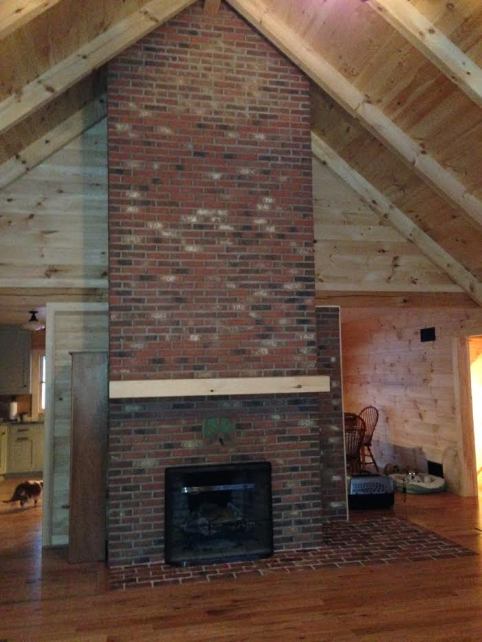
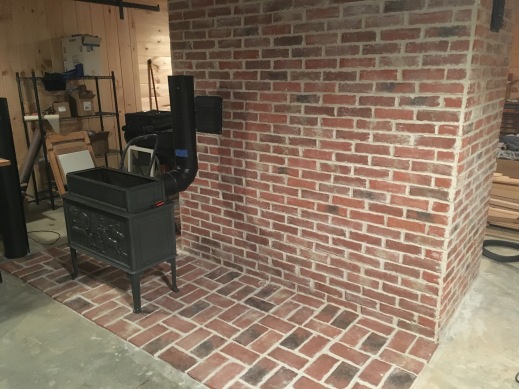
Installed brick tile floor – ready to get sealed

Done! Take a picture and send it to me!

Built on Customer Service

We were proud to learn early this year that we were given a Best Of Houzz award, in the category of customer satisfaction. I can’t imagine a category that would make me more proud. After all, if our tiles weren’t beautiful, if I didn’t listen to our customers’ needs, if we didn’t deliver in a timely way, or if our customers were disappointed at all, there would be no satisfaction for Houzz to recognize. It is really about the total experience. Our customers wrote to Houzz to recommend us for this award, completely unsolicited. Thank you to those of you who sent in recommendations — you know who you are, even if I don’t.

Remodeling and Home Design

There are many things that are part of this avocation of mine. I work with many architects, builders and designers, as a kind of team. We all work with the same goal in mind — to make the home owner happy, and to create a space that is both beautiful and easy to live in.

Custom brick tiles in dog shower

Proud Airdale in his doggy shower with custom brick tile border

I was raised in a merchant family, growing up under my dad’s feet in the prescription room of his retail pharmacy. His customers were his friends, living together in our small Wisconsin town. At dinner, on holidays, and in the middle of the night, he would leave the house to open his store for people in our community, who needed their meds right away. Although most of my customers are in other states, my instinct is to create that same sense of community for them. It used to be that people knew who created their goods and services, instead of the disconnect that is part of our time. Like my dad, I live my business. When I am out of the office, I have call-forwarding to my cell. I pick up evenings and weekends, because sometimes people are in the middle of installing their tiles, and have a question. (Not in the middle of the night, please…I will be polite, but not happy!)

I don’t just sell tiles. I can be a resource every step along the way, from the design to the finishing details. When customers visit my office, they will often bring blueprints, cabinet doors, and pictures of how they envision their home. Sometimes they email me the room plans, photos, or drawings, and we use those to work together. I am an artist/designer, and offer free advice and consultations to my customers, when asked. If I think our tiles will not be right for a space, I will say so. I look at pictures of existing bricked parts of a home, and help make suggestions of which color mixes will look best with it. I know all about the installation process, and can help with grout selections and recommend sealers. I often help customers find installers, if they are working on their own, or talk with their installers on the phone. Sometimes people will ask where they can find certain historic fixtures, or other items for their homes, and many times I can pull a card from my Rolodex.

Dog prints in custom brick tile

Prints from customer’s dog in their brick kitchen floor

Our tiles are all made to order, and are custom. We have suggested color mixes, but those are just a guide. Most customers decide upon their own color mixes. Here is a recent picture of one of these mixes — the customer pulled the plastic back to take a quick, informal picture of the work in progress (foot and all). This mix has all off-white clay powder and wood fire ashes, fired into our red clay body. (I’m kind of in love with it!)

Brick tile with custom color mix

Custom color mix in text from happy customer

Often, people will ask for a particular size or texture for our bricks. I will make up a new series of molds, at no extra charge, for orders of over 1000 sq.ft.

I have also created special accent tiles for customers. Once we did floors in a restored pig house, and there were a few pig tiles made for the floors. Another customer wanted a raven tile, because their farm was named “Raven’s Den”. Still another had me make a cast of her grandma’s cow butter mold, and I made some tiles for her floor. We make stamps of pet footprints, or child hand prints. We stamp the names of children, or special dates, into the tiles. People have sent me plants from their garden, and we will fire these impressions into the bricks. When these plants, or stamped tiles, are part of the total order, I don’t charge extra — it’s just part of the fun.


Brick tile design from antique butter mold

Custom tiles made from an heirloom butter mold

Brick tile with custom pig design

Custom pig tile for renovated “pig house” turned guest cottage

Some customers have made arrangements to bring their children to my home/office, and I set them up at a table with damp tiles to decorate. We have a craft day, and they create their own pieces to include in the family’s wall or floor. If I’ve just baked, customers have been known to sit down for apple dumplings, brownies, or banana bread (and take home recipes).

Children decorating tiles

Children decorating Inglenook brick tiles

Children decorating tiles

Close up of brick tile decorating at work

Maybe this is why so much of our business comes from referrals, or even from homeowners who bought tiles from us before. Sometimes past customers come to see me when they are in the area, invite me to their homes, and send Christmas cards.

With most of our houses furnished with mass produced items, often imported, sometimes it’s nice to look around our homes, and feel a connection to the artisans who were part of them. It’s even nicer when we know that we were part of the creative process. There is a Latin expression, anima locus, which means the ‘soul’ of a place, or its essential personality. I like to think we are part of that signature in a home, and are somehow connected to the families who live there.

Featured Installation: The Mylin House

The Mylin House is a restoration project almost in Inglenook Tile’s back yard, on the park-like property of a well-known luxury retirement village.

Image

The historic Mylin house is used for special village functions.The grounds surrounding the house are landscaped as garden plots. They are beautifully maintained by residents of the community.

In 1787, Martin Mylin III and his wife, Barbara Baer Mylin, built the existing stone farmhouse, above, where they raised their eight children. Martin Mylin, the first owner of the land on which the Spring Run community now resides, received the property as a land grant from William Penn in the early 1700’s.

Image

The property stayed in the family for over 100 years. In 1926, it was sold to Christian Herr, the founder of Herr Potato Chips, a well-known Lancaster County snack company. Herr’s first potato chips were made in a barn on the property. In 1998, the property was acquired by the retirement community. 

After walking in the front door that was hand-crafted by a local firm, our brick tiles are immediately visible from the main entrance. The foyer opens into a large meeting room, with our brick tiles on the floor.

Image

The first striking feature of the room is the unusual colors of the walls. The vivid paint tones are not what one would expect in an historic building, but the use of bright colors was common in early homes. The property manager explained to me that when they scraped the walls, these were the colors at the lowest levels. 

Image

Image

The other striking feature is the woodwork and built-in corner cupboards — all original to the building. Inglenook brick tile complements these historic features beautifully.

Image

Image

We are delighted to have our thin brick tiles gracing the floor of the Mylin house. We know that the strength and durability of Inglenook brick tile will ensure the floor will maintain its timeless look many more generations in this beautiful historic building. 

Image


Featured Installation: The Lodge at North Shore

The Lodge at North Shore

View of The Lodge from lakeside

Second Homes At Deep Creek Lake is a shared ownership vacation home business in the Allegheny Mountains of western Maryland and the passion of owner, Pam Scott.  The Lodge at North Shore is a luxury vacation home, featuring Inglenook brick tiles in many of the common areas of the living spaces. Pam chose King Street brick tiles in Providence color mix, with extra brown flash from the reduction gas kiln firing. This combination blends beautifully with the wood tones of other floors, trim and beams and with the hewn exposed stone.

Kitchen brick tile flooring

Pam needed a durable material for the high traffic kitchen floor in the home — something that would hold up well to many feet running between the house and the lake. She chose our brick tiles for the low maintenance, durability and the hand-crafted quality.

Kitchen brick backsplash and thin brick floors

The kitchen joins the great room, in one open space. Our brick tiles cover the large kitchen floor and are used on the back splash.

Kitchen decorative brick backsplashThe King Street tiles also cover the wall next to the bar in the game room.

Thin brick bar area

Pam says,

“Working with Inglenook Tile was a pleasure from start to finish. In the beginning, when I wasn’t sure exactly what I wanted, they were very helpful in making suggestions and sending samples. Delivery of the order was as promised. I am very happy with the look we achieved, and I would recommend their product to anyone.”

After we worked with Pam, she recommended us to the people at Blue Moon Rising on Deep Creek Lake, a learning center for sustainable education, and they also used our tiles! We will talk about this project in a future blog post. I have been invited to visit Deep Creek Lake, and maybe I will get there this year — after all, I already have a group of friends there, whom I have never met!

To see more pictures of The Lodge, go to Pam’s website.

Hearth and Home — The Fireplace

Kirk Fireplace

Anyone who has started a business will smile at the memory of selecting the name. The name is important, and sets the tone for the future. What is this child you are creating? What are your hopes and dreams for this new creation? What would you like to offer the world, when you give this gift of a name?When my daughter, Emily, and I brainstormed names for our company, we wrote down many ideas. We liked the name “Lions’ Gate tiles,” because of the massive female stone lions at the main gate of the ancient city of Mycenae. My major was Classics in college, and the image of these guardians was a favorite of mine. But there was already a film company by that name, and it seemed confusing. We liked the name Shakti, because of the “girl power” meaning of the word. However, it sounded too Indian, and we are made in America.We settled on Inglenook Tile Design. During one of my university “vacs” in England (many years before), I stayed in a cottage named “TOAST,” belonging to my friends Linda and Ralph. When Ralph ripped out a wall of the cottage, they found a huge, walk-in fireplace, covering the entire back wall. You could walk inside, and one could imagine an old granny nodding in the stone seat within the side wall. It was the heart and center of the home, where you prepared food, told stories and kept warm. This was the kind of home energy we wanted to emanate from our little company. So Inglenook Tile it was.

True to the spirit of the name, our brick tiles now grace many fireplaces and chimneys. The Kirk fireplace pictured above is the creation of our customer, David Kirk. He wanted a fireplace in the family’s basement family room, but there was no chimney. He used our tiles to create the ambiance of a fireplace wall.

Another customer  created a fireplace wall, with a mantel, for their wood stove.  The built-in alcove provides storage for their wood. In addition, the brick tile absorbs the heat from the wood stove, and radiates it back into the room.

Brook’s Kitchen

The Hanleys also used our tiles as a focal point for their wood stove.This clever hearth is part of a brick tile floor. The hearth area is marked off with a frame of tiles set in a different pattern, and then the herringbone pattern is continued into the firebox. The result sets the hearth aside from the rest of the floor. Another fireplace surrounded the wood-burning firebox with a soldier course of our brick tiles, and created a slightly elevated hearth. Still another created a similar, traditional fireplace for their pre-fab gas log insert.

Hanley Wood Stove Enclosure

Other customers like the warmth of a fireplace in the kitchen.  Here are two pictures of kitchen wall fireplaces. Brook used our tiles on his kitchen floor, and also on the fireplace wall, adding warmth to the seating area.  The other wall fireplace encloses a gas insert, and a small alcove was also created beneath the firebox, to simulate an opening for wood storage.

Brook’s Kitchen

Kitchen Wall Fireplace

Our tiles have also been used on the outside of the house, to create the look of an exterior chimney, where a full-thickness brick could not be used.

Lauhoff Chimney

The uses of our brick tiles aren’t limited to use in the home — the Lorien Hotel and Spa, in Alexandria, Virgina, built a tall pizza oven wall in their dining room.  This created a traditional Mediterranean ambiance for the restaurant. Many of the floors in the common areas of the hotel are also our tiles.

Lorien Hotel Pizza Oven Wall

Use your imagination to create the warmth of a home fire in your own castle.
Fireplace Surround For Gas Fireplace
Fireplace Hearth
Fireplace Hearth (set within a brick tile floor)

Updated List Of Brick Tile Styles

There are a number of brick tile styles that are not yet on our website. I would like to introduce you to our assortment of brick tiles!
We have three styles that are roughly 4×8″ :
Wright’s Ferry
Tumbled sides and textured surface
Traditional Antique
Straight sides and textured surface
King Street
Straight sides, smoother surface
We have four styles that are slightly smaller than  4×8″:
Rutherford
Makes a good basket weave. 3-1/2×7-1/2″, straight sides and smoother surface, like King Street
Summer Kitchen
Just like Rutherford, but 3-1/2″x7″
Wimers Mill
The same size as Summer Kitchen, but with a textured top and rugged sides
San Sebastian
3×8-3/4″, straight sides, smoother top.
We also have 2×8″ and 2×4″ style for the “side” view of bricks. These sizes are most commonly used on walls, chimneys and other vertical surfaces, but they have also been used on floors and even arched ceilings.
Lancaster Running Bond
2×8″, tumbled sides and texture like the Wright’s Ferry
Watch for our next post with side-by-side comparisons of our various styles of tiles!

Social Media Updates

AN UPDATE FROM JULIE GOOD-KRUGER, OWNER OF INGLENOOK TILE DESIGN

There have been many changes with us at Inglenook Tile Design over the last months. We have moved our tile-making operation from our warehouse in Kinzers, PA, to a work facility for the blind and vision-impaired in northeast Philadelphia. I am now working from a home office, in Lancaster County, PA, and making periodic trips to the new warehouse. We had a rocky start, when our large kiln was dropped during the move, but everything is now running smoothly. My new office number is 717-806-3900. I still meet with customers at my home office, and have loose tiles and concept boards to show. If you would like to visit, please call me to make an appointment.

Many of my visitors have liked the brick tiles in my front entryway, and so we have made a mold of this style, and called it Wimers Mill. This tile is slightly smaller than our usual 4×8″ tiles, with a textured top and a very rugged edge. The grout lines need to be wider, as a result of these uneven edges. What I did with my own floor was to press tiny pebbles from our stream into the mortar. When I sealed the floor, it also shined up the tiny pebbles. The black in the texture was done with a water-soluble shoe polish. It can be found at any Dollar Store — the Kiwi polish with a felt tip. After I used a low gloss sealer on the floor, I squeezed the black polish into some of the texture, then wiped off the top with a damp rag. After it dried, I sealed the floor again.  I did the same with the mortar. This lovely kitchen is a picture shared by the Cahill family, who visited my home office before Christmas 2011.

If you haven’t visited our Facebook page, please follow my regular posts, at Inglenook Tile Design. If you click “Like,” you will see pictures in your news feed.

I also found a wonderful site called HOUZZ.COM when I was looking for bathroom vanity ideas that I could build myself. I saw that they offer pages to builders, designers and people like me, and so I have also been uploading pictures daily to my HOUZZ site. You can create albums there for things that catch your eye, as you browse through their various categories. http://www.houzz.com/pro/inglenooktiledesign/__public

Our daughter, Emily, will be getting married this summer in our back yard. She and her cousin started a Pinterest board, called Em’s Fairytale Wedding. I started posting ideas on that, and then started another “For The Home,” which also has postings of Inglenook  Tile Design pictures (as well as other things I like, and links to some other artisans I know).  That board can be found under my name, Julie Good-Kruger. There is a limit to how many pictures I can put on the website, and our customers often generously send us photos of their projects. This gives me a chance to post many more pictures than you will be able to otherwise access.

Enjoy the lovely Spring!

Julie Good-Kruger

Through the years with David and Pam Haring

Pet Friendly Flooring!

David and Pam Haring bought their home from Pam’s aunt, and she has many happy memories of time spent there as a child.  The Chester County, Pennsylvania, house was built around 1900, and has been in the family for many years. The Haring children were raised here, and now that they are grown, David and Pam share their home with two friendly, rescued dogs.

Hannah Kincaid Schofield

The home is filled with family antiques, and everything has a story. One heirloom of note is a striking museum-quality oil portrait, which hangs in the master bedroom. It is a beautiful image of Pam’s great-grandmother, Hannah Kincaid Schofield, born in 1822. The artist is unknown.

Another of Pam’s special pieces is incorporated into her Inglenook brick tile floor — a lovely, hand-carved cow butter mold, which once belonged to her mother-in-law.  Pam brought Julie (owner of Inglenook Tile Design) the original wooden mold, and Julie first made a polymer clay cast. This she hardened in the oven, and then made another mold for the final pieces. The butter mold was returned to Pam in its original, perfect condition.  A window-shaped depression was made in a brick tile model, and the image of the cow was inserted, so that the design would not extend over the tile surface to create a tripping hazard.

Hand-carved cow butter mold

Pam and David loved the special touch of the cow on the floor — so much so that they also requested a few pigs, and some fern “fossils”. Pam proudly points them out on the floor. 

The Harings chose the Wright’s Ferry brick tile, with its tumbled sides and rustic surface, in the Marietta color mix. Their Inglenook brick floor covers most of the first level of their home. It extends throughout the large kitchen, with a seamless transition into an equally large dining room. This floor held up well to the constant foot traffic and the large dogs. After the floor was installed, Pam and David decided to use the 2×8″ Lancaster Running Bond tiles to face a wall behind the dining room buffet. 

Dining Area

“I never want to live anywhere else,” says Pam. How lovely to be so contented, and know you are home!

The Haring Home


Featured Installation: “Pig House” — a guest house renovation

Concept of Lea projectJake and Gretchen Lea bought their lovely farm in Berks County, Pennsylvania, in 1972, and raised their twins there. The twins grew up, and the Leas decided that they needed a more private place to stay when they visited their childhood home with their families. 

Gretchen is a designer, and saw our tiles at the Historic Home Show, in Valley Forge, Pennsylvania. She and Jake were planning a guest house on their property, and knew right away that our tiles would be ideal for the floors. Gretchen is full of imagination, and could see the possibilities in the touches of whimsy we could provide for her floors. In her work, she likes to include little “surprises” in the rooms she designs…which makes her a kindred spirit to Julie, owner/designer at Inglenook Tile.  

Jake enjoys piloting his small plane, so one day he and Gretchen flew to a small Lancaster County airport to see the tiles again. Julie picked them up at the airport, and brought them to the warehouse, so that they could see the full selection of styles and colors, and customize their order.  

In 2007, Jake and Gretchen decided to level the old pig sty on the property, where they raised pigs when the children were young. On the site, they built a new “pig sty” guest house, designed to complement the other buildings on the property. It has two bedrooms, a powder room, a full bath with a washer/dryer, a kitchen/dining room, a living room, and upstairs hallway. When Gretchen was planning the floors, she wanteFloor details lead a few tiles of pigs, to reflect the history of the old pig house that once stood on the site. We created a brick tile with an inset pig sculpture, to be placed randomly in the floor (see detail picture). 

Now when the twins visit, they stay in their own guesthouse. There are other guests that also enjoy the “pig house”; for example, a director from California recently took up residence there for a month and a half, while he worked with a local non-profit theater. Visitors can fish in the pond, swim in the pool, and walk the 2 fields of wildflowers on the Lea’s eighty acres of Berks County farmland. They have allowed their property to be used as a site for Geocaching (www.geocaching.com), and sometimes they enjoy seeing families digging for the “treasure” in their woods. Gretchen’s creativity is not yet satisfied with the “pig house” — she has plans to create additional living space in the tower silo.  

Lea kitchen

When asked how she feels about the tiles, now that they are installed, Gretchen says, “They fit in beautifully, and gave us a rustic look at a reasonable price.” She added that, as a designer, she appreciates working with companies that take pride in their work. 

Lea stairway 

If you are interested in working with Gretchen, she can be reached at glea316@ceinetworks.com, or at 610-367-6773. Her website is www.gleainteriordesign.com .